Discontinued
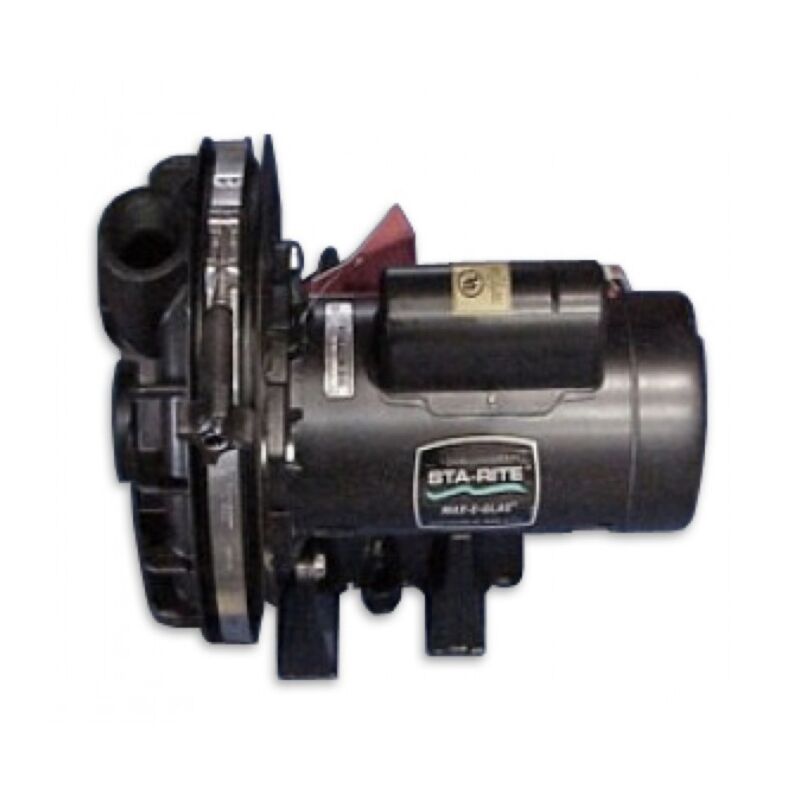
Starite Max E Glass 1 hp single speed jet pump for pre 1993 Hot Spring models.
The jet pump provides power for the hydrotherapy system by recirculating water from the spa, drawing it through the skimmer and filtration system, and forcing the water through the fixed jets, Moto-Massage jets and Jetstream. These pumps are designed for the presence of water at all times.
The opening at the bottom of the door is a vent for the heat generated by the operation of the jet pump. The vent will eliminate the problem of overheating pump motors and protect the other components for excessive heat. It is important that vent opening be kept clear at all times. If the vent opening becomes obstructed, overheating of the jet pump may occur.
Caution: Installation of a rodent screen may increase the possibility of obstructing the vent opening with debris.
On later model spas, each jet pump is equipped with a pump shroud. The pump shroud is attached to the rear of the jet pump. This shroud is a vent for the heat generated by the operation of the jet pump motor. The shroud will eliminate the problem of overheating pump motors and protect the other components for excessive heat. It is important that the vent outlet for the pump shroud be kept clear at all times. If the pump shroud outlet vent becomes obstructed, overheating of the jet pump may occur.
- 16 amp/115 Volts AC or 8 amp/230 volt AC, 1 hp, 1 speed
|
| Removal |
- Disconnect power to the spa.
- Access the equipment compartment.
- Drain the spa.
- Disconnect the the jet pump from the control box.
- Remove the copper bonding wire from the bonding lug on the jet pump motor.
- Drain the pump by removing bleedline from the drain barbfitting or plug.
- Turn the jet pump unions counterclockwise on the intake and discharge of the jet pump to disconnect them from the plumbing.
Note: Make sure to save the union o-rings.
- Remove the mounting bolt(s) securing the jet pump to the equipment compartment floor.
- Remove the jet pump from the equipment compartment.
- To reinstall the jet pump, reverse steps 1 to 9.
Important: Make sure that the jet pump union o-rings are properly seated when re-tightening the unions.
|
Specifications
|
| Item |
|
1 H.P. |
2 H.P. |
All Models |
Plumb. Fitting |
| – |
Pump |
30215 |
31239 |
|
|
| 1 |
Seal Plate |
|
|
70032 |
|
| 2 |
Impellor |
30223 |
70120 |
|
|
| 3 |
O-Ring |
|
|
30222 |
|
| 4 |
Freeze Drain Plug |
|
|
30218 |
|
| 5 |
O-Ring |
|
|
70033 |
|
| 6 |
Volute |
|
|
30217 |
|
| 7 |
O-Ring |
|
|
30220 |
|
| 8 |
Clamp |
|
|
30219 |
|
| 9 |
Screw |
|
|
70036 |
|
| 10 |
Washer |
|
|
70158 |
|
| 11 |
Diffusser |
|
|
30221 |
|
| 12 |
Seal Assy |
|
|
30224 |
|
| 13 |
Water Slinger |
|
|
70039 |
|
| 14 |
Bolt |
|
|
70059 |
|
| 15 |
Pad |
|
|
N/A |
|
| 16 |
Bolt |
|
|
30370 |
|
| 17 |
Washer |
|
|
30413 |
|
| 18 |
Bolt |
|
|
70035 |
|
| 19 |
Washer |
|
|
70158 |
|
| 20 |
Mounting Bracket |
70031 |
70126 |
|
|
| 21 |
Vinyl Tubing 1/4″ |
|
|
|
70318 |
| 22 |
Clamp 1/4″ |
|
|
|
31134 |
| 23 |
Pump Cord |
|
|
10409 |
|
| 24 |
Nut |
|
|
N/A |
|
| 25 |
Insert |
|
|
70071 |
|
| 26 |
Barbed Fitting |
|
|
|
32267 |
| 27-31 |
Motor Assy |
|
|
|
|
| 28 |
Capacitor Run |
30228 |
N/A |
|
|
| 29 |
Capacitor Starting |
N/A |
70128 |
|
|
| 30 |
Cover |
|
|
34480 |
|
| 31 |
Points |
N/A |
N/A |
|
|
| 32 |
Flex Tubing 1-1/2″ |
|
|
|
70309 |
| 33 |
O-Ring |
|
|
|
30237 |
| 34 |
Adapter |
|
|
|
31348 |
| 35 |
Union Kit |
|
|
30548 |
|
| 36 |
O-Ring |
|
|
|
30261 |
| 37 |
Adapter |
|
|
|
30552 |
| 38 |
Union Kit |
|
|
|
N/A |
** Order Pump, Complete listed above
N/A Part Not Available
|








Reviews
There are no reviews yet.